HGUC Ground Type GM remake – work in progress
November 7, 2020 at 19:33 | Posted in Work In Progress | Leave a commentTags: 08th MS Team 2020, HGUC GM Ground Type, kitbash
The initial plan was to do a straight build of the HGUC Ground Type GM, but like many of my projects, this too morphed into a heavy kitbashing build. I had a surplus of spare parts from Yellow Submarine, so it’s a good chance to make use of them.
Head:
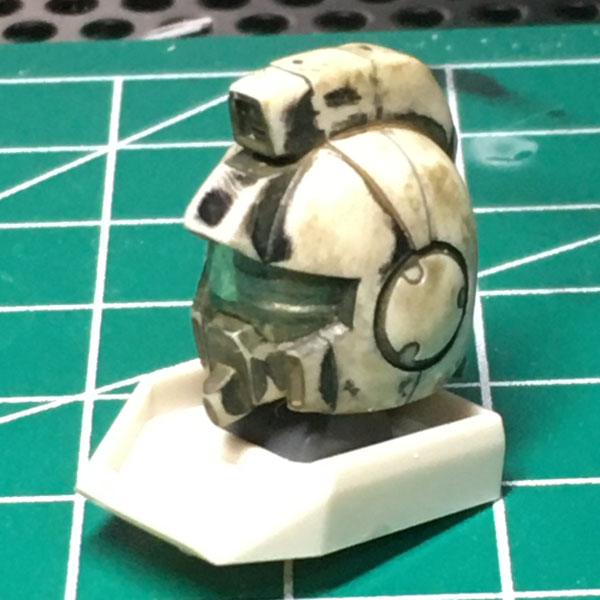
I may be repeating myself, but I never liked the new design of the GM Ground Type head. After completing the GM Sniper remake, I decided to retire the old GM Sniper and reuse its head for this build. I used Mr Paint Remover to remove as much paint as I could:
Body:
The chest was from the HGUC Ground Type GM kit. The waist part was elongated by 1.5mm, and I also glued some thin plastic strips on the sides:

The front skirt armor was from the new HGUC RX-79[G] kit. I added some tank parts on it for some detail.

Like the HGUC Ez8, I also wanted to flip the back skirt. I attached MSG hinge joints shown by the red arrows.

On the back skirt, I glued some leftover parts from a RG kit for extra details.

Arms:
I decided to use shoulders from the HGUC GM Striker. However, the shouder joints didn’t match the GM body. So I cut and pasted the ball joint from the RX-79[G] shoulders (the white plastic).

I also cut and pasted the sockets holding the polycap joint from the RX-79[G] shoulders.

Again I transplanted RG hand and wrist to the HGUC forearm:

Legs:
I used the legs from the HGUC Mk II Revive, because of the nice thick thighs (don’t judge). I covered the thrusters on the side of the legs with epoxy putty:

I also cut off the armor piece from the back of the legs:
The feet were from the original GM Ground Type, and I filled empty gaps on the bottom with putty:

Accessories:
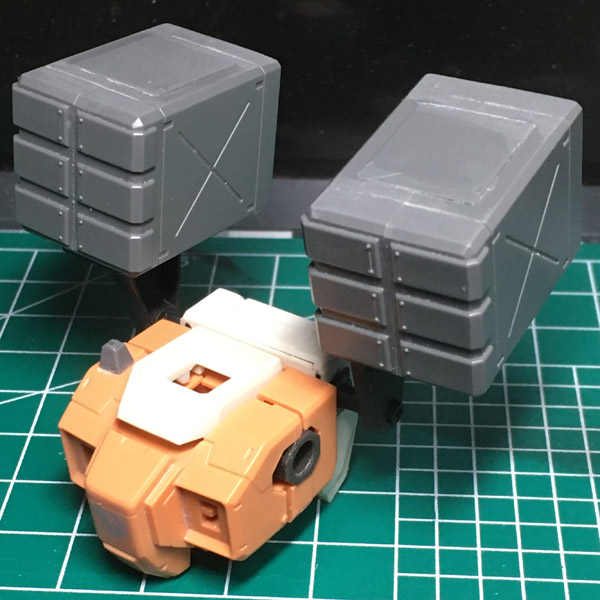
I decided to use some leftover parts from the Ez8/SR build. To connect them to the backpack, I attached 3mm sockets by Kotobukiya MSG to the sides, and filled the gaps with Gaianotes Color putty.

Then I can attach these pair of rocket launcher boxes:
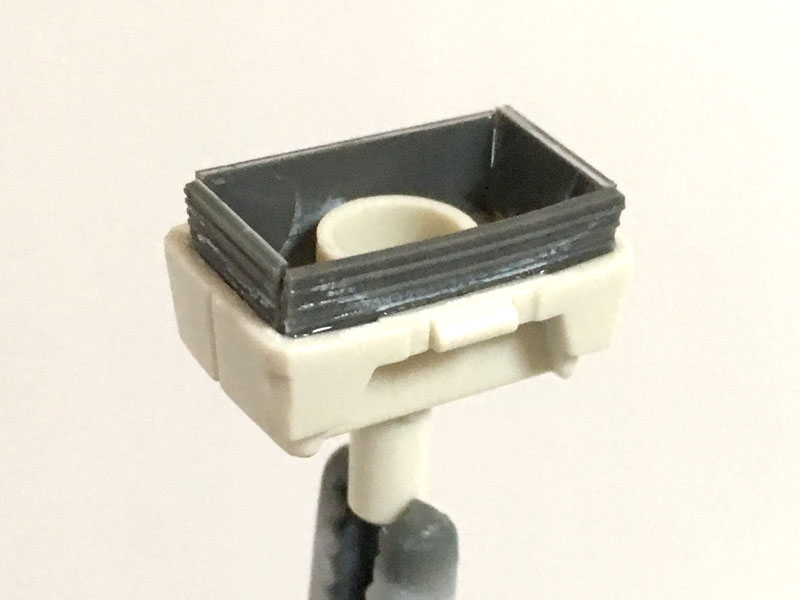
And this cannon. I replaced the barrel with a thicker one from a tank model kit.

I also had some leftover bazookas and beam rifles from other kits.
So here’s the overall look:

I’ll stick to the original colors, but with a slightly darker hue like in the anime:

HGUC Blue Destiny – Work in progress
May 4, 2018 at 17:17 | Posted in Work In Progress | Leave a commentTags: HGUC Blue Destiny, HGUC GM Ground Type, kitbash, work in progress
This is another case of buying spare parts to add to existing spare parts, if that makes sense. Basically I had some leftover HGUC Ground Type parts from the previous GM Head build.
The remaining parts were the body and head, so I needed some arms and legs to complete it. I went to Yellow Submarine to find some body parts and found mostly Blue Destiny parts on that day, so that’s what I went with.
If you didn’t know already, Yellow Submarine shop in Akihabara sells gunpla spare parts, separated by body part, e.g legs only or arms only. The selection is fairly random, so you may not always get the parts you wanted. But they tend to have parts of new kits a day or so after release. Anyway, on with the build:
Head:
Instead of using the new HGUC GM Ground Type head, I bought the new HGUC Blue Destiny Unit 1 heads. Heads because the kit came with 2 head variants. I used the one with the commander antenna.
Body:
For the top half of the body, I used the GM Ground Type parts. On the shoulders, I added some detail parts from Wave.

I decided to replace the square chest vents with the muzzle from a pair of HGUC Kampfer shotguns. I had to drill some holes on the GM chest first to accommodate them.

The hips were from the Gundam Local Type kit. I inserted a ball joint and socket from Hobby Base, and padded it with epoxy putty.

Instead of elongating the waist like I always did, this time I added corrugated pla-plate (from M.S.G) around the waist, like so:
Arms:
I still had the shoulder armor from the GM Ground Type, but no arms. So I bought the HGUC Blue Destiny Unit 3 arms. Since they’re both from the newer kits, there’s no compatibility issues. For the hands, I again went for the RG Mk. II hands like I did with the GM Head.
Legs:
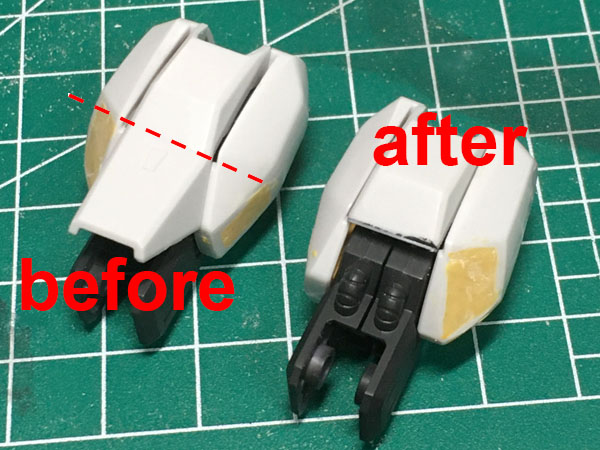
I used the legs from the HGUC Blue Destiny Unit 1 kit as it is. The only issue was the visible seam lines on the ankle armor. Instead of using the typical method of seam-line removal, I decided to disguise the seam-line by adding 1mm plastic strips near it, like so:

Now it appears that the seam line is a natural part of the design.
Weapons:
No specific weapons this time. That’s because I have plenty of Little Armory weapons stocked up, hence the RG hands.
So this is the picture I took when I was testing for the overall proportions:

This is a fairly short work-in-progress post. I didn’t modify too many things for this build because I wanted to focus on the paintjob. Which in this case is the woodland camo. Here’s a mockup of what I had in mind:

I’ve attempted several camo paint-jobs on Gunpla before, but I was never really happy with any of them. Hopefully this time I’ll get it right.
HGUC GM Head
April 24, 2018 at 20:46 | Posted in 1/144 scale | Leave a commentTags: ジム頭, 陸戦型ジム, GM, GM head, HGUC GM Ground Type, HGUC Ground Type Gundam, HGUC RX-79[G], kitbash, weathering, Year of the GM
Introduction:
Usually when I kitbash, I tend to add newer parts to older kits. But in this case, it’s the other way round. I added parts from the older HGUC RX-79[G] kit onto the newer HGUC GM Ground Type kit because I prefer some design aspects of the older kit.
The other motivation for this build is to pose it with my Little Armory kits, which is why I wanted to fit it with RG hands.
For the color scheme, I played around with various ideas, but eventually I went for the simpler white/navy-blue color scheme of the S-type Gundam from Thunderbolt.

Materials & methods:
The work in progress can be read here.
After spraying grey surfacer and applying pre-shading lines, I proceeded to paint it as follows:
White parts: MS White 100% (Gundam Colors)
Blue parts: Midnight blue + Intermediate blue. I forgot the actual ratios.
Yellow bits: Orange yellow + a bit of MS white.
Joints were the standard Dark Grey 2.
Then I applied some weathering in the form of enamel wash, paint chipping & smears using enamel and markers, and weathering pastels at the feet. After that it’s decals and a flat topcoat finish.
Results:


Here’s the assortment of weapons and accessories. I went ahead and painted the RX-79[G] head as well, just because.


Some action poses, including with some of my Little Armory weapons:


Finally some group photos. In terms of height, it’s: GM Sniper (OOB) < GM Head < Ground Type GM (mod).


Discussion:
This is my third kit to feature the GM Ground Type head, and the reason for it is simple: it’s the best looking GM head so far. The GM III head comes a close second. The new HGUC Ground Type GM head however, doesn’t have the same appeal.
In case you’re wondering, you can get these nicer looking heads from the HGUC Ground War set or the P-Bandai HGUC GM Sniper II White Dingo kit.
My favourite parts of the new HGUC GM Ground Type are the legs and forearms. Everything else, the older RX-79[G] is superior, especially the short front skirt armors.
To combine these different parts into a single kit is what’s most satisfying in this build. So next up is another ground-based unit.
Modelers-G

Blog at WordPress.com.
Entries and comments feeds.
