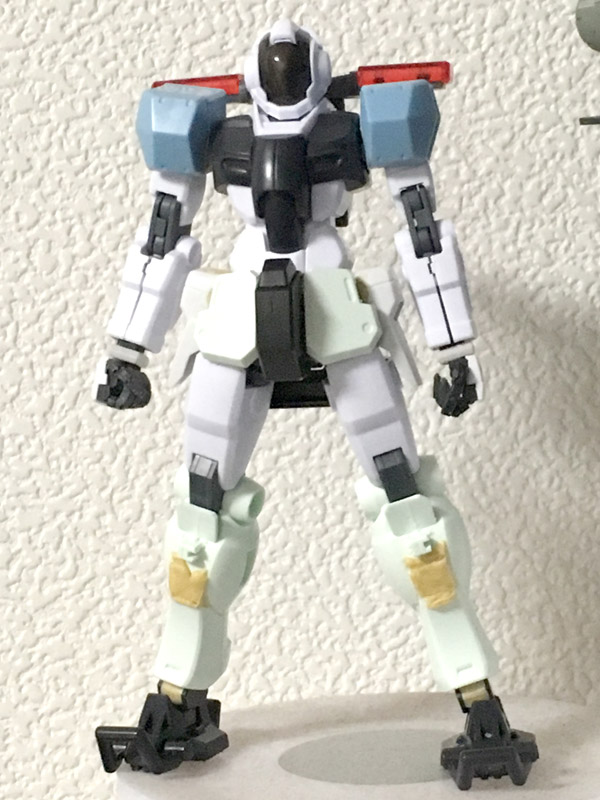
Guard Frame – Work in progress
May 20, 2019 at 21:51 | Posted in Work In Progress | Leave a commentTags: HGBD Guard Frame, kitbash, M.S.G weapon, work in progress
I already had a specific theme for the HGBD Guard Frame: riot police.
Head: The kit comes with two types of heads; I’m using the visor head for this build.
Waist: I’m using the waist from the Gundam MkII revive kit, with the front skirt armor from the GM/GM.

For the side armor, I’m using the ones from HGUC GP01. I cut & pasted the original Guard Frame side armor socket, and covered large gaps with epoxy putty.

That way it can fit the polycap joints on the waist.

I also attached some extra detail to it.

Backpack: The original backpack looks a bit plain, so I added a mix of detail parts from Wave and Kotobukiya MSG.

In line with the police theme, I attached police lights from the MSG Ballistic Shield set.

Shoulders: I wasn’t too keen on the original shoulders, so I replaced them with the ones from the HGBD Seravee Gundam Scheherazade kit. I changed the position of the peg using some spare GM parts, so that the shoulders are slightly raised.

I also added some detail parts to the shoulders.

Arms: I’m attaching RG Strike hands to the original arms. This involved simply gluing the RG wrist socket to a Kotobukiya pipe, and then attaching it to the original elbow joint. Some excess plastic inside the original forearms had to be removed to accommodate the RG wrist.

Legs: The original legs looked a bit scrawny, so I used the GM/GM legs instead. I liked the original knees, so I cut off the GM/GM knees and glued it there.

At the back, I attached some details from a scale model spare part I had lying around.

On the side of the calves, I attached some extra parts from the HCM-Pro Ez8 kit.

Armaments:
I’m using the leftover shield from the HG Bugu kit. I attached some plaplate the the bottom of the shield to make them pointier.

I needed a peg to attach the shield to the forearms, so I made a crude peg made from Bugu and GM spare parts.

For weapons, I used the shotgun from the MSG Ballistic Shield kit, and attached some spare ‘shells’ made from Jesta parts.

The gun was also from a MSG bazooka kit, but I replaced the grip with the one from the RG RX-78 beam rifle.

So here’s how it roughly looks like:
HGUC Jegan (ECOAS type)
April 30, 2014 at 15:31 | Posted in 1/144 scale | 4 CommentsTags: custom mod, GM, Jegan ECOAS, kitbash, Kotobukiya assault rifle, M.S.G weapon
Introduction:
Having built and modeled two Jesta kits with military styles, I wanted to build another kit in a similar theme to make a trio. Instead of another Jesta kit, I decided to go for the HGUC Jegan ECOAS type. It already has some nice ‘tactical’ look to it, particularly the head.
However, I never warmed up to some aspects of the Jegan. The first thing to replace are those bulb-like lower legs. The arms also felt a bit too thick, so those were also replaced. So after scouring the Yellow Submarine shop for spare parts, I settled for Jesta legs and GM arms as replacement.
Materials and methods:
For a more comprehensive post about the changes I made to this kit, refer to the WIP (work in progress) page here.
To summarize, the lower legs were replaced with HGUC Jesta legs. The arms were from GM Striker & GM Kai. The waist was from GM Sniper II. The front skirt was from HGUC Loto, the back and side skirts were from GM Sniper K9. The backpack was modified to include tube tanks and smaller thruster, as well as modular components (missile launchers & radome units). Here’s what it roughly looked like after the structural modifications:


Armaments include an assault rifle from Kotobukiya, a handgun modified from GM Sniper K9, a long rifle from System Weapon 002, 2 types of bazookas and a combat knife.
All parts were primed with dark grey surfacer (Evospray). For the paintjob, I kept it simple this time. The feet, front skirt and removable chest armor were sprayed with Olive Drab (Tamiya). The inner feet, waist, and some part on the crotch & head were painted grey-brown. The rest of the body was painted with Khaki brown + green. The joints were sprayed with MS Gray. Weapons were sprayed with Germany gray, Gunmetal and MS Gray while the missiles were sprayed with red. Panel-lining and light weathering was done with enamel paints. After applying decals, I sprayed the final flat topcoat.
Results:
Here’s the first modular unit: high-mobility mode. It’s essentially the default mode, with all thrusters on the backpack. Armaments include HK416-type assault rifle with grenade launcher attachment, a MK23-type pistol and combat knife.


A slight modification of this mode involved swapping the upper backpack thrusters with a small 3-grenade launcher (Kotobukiya) and a hook for holding the assault rifle. The grenade-launcher attachment peg on the left skirt was replaced with a pocket-like attachment from GM K9. I call this sleeker form ‘infiltration mode’.


CQC!


The second modular unit is reconnaissance mode. Backpack thrusters are replaced with spare tanks, radome unit and sensor unit. Armaments include a rifle for long-range engagements. It’s actually from System Weapon 002, with the suppressor from HGUC Jesta’s beam carbine and scope from M.S.G Shotgun.


And here’s the barrage mode. The thick armor was attached to the chest, and two types of missile launchers are attached to the backpack. Side skirts and right leg attachment are also replaced with missile/grenade launchers. Additional armaments include the original Jegan bazooka and a Unicorn bazooka.


And finally group photos with my previous Jesta kits


Discussion:
My initial plan was to just built a kit that would look good beside my two other Jesta kits. As I started snap-fitting and modifying things, this project evolved into something more elaborate. I decided to go all-out with the tactical & spec-ops theme, and the end result is what I feel, an upgrade to the Jegan ECOAS design.
I wanted to make the weapons resemble conventional weapons (except the bazookas). The Kotobukiya assault rifle is essentially a HK416, the pistol was modified to resemble the SOCOM Mk 23 and the long rifle slightly resembles a SR-25 rifle. Of course a giant robot with conventional weaponry makes no sense (especially with a suppressor, in space), but the point here is to make it look badass.
I also used flexible hands from Hobby Base (Yellow Submarine) for the first time. They’re poseable like MG hands, but in 1/144 scale. Assembling them can be tricky, due to the small parts. At first they felt fairly robust and extremely poseable, but after fiddling with them during photography, the fingers tend to pop out. Unfortunately I broke the ring finger on the left hand so I glued them back, but obviously that original poseability was lost. Most of the photos were taken on the H-hangar base by Wave which I painted and added a few decals. The LED lights were sold separately. That’s as close as I’ll get to an actual diorama.
The build-up to this was quite a different process compared to my other projects. Usually I decide upon a certain theme or look for the kit and stuck with it until finish. But this project involved a lot of chopping and changing along the way that I was never really sure how it would end up. In the end, I think this might be one of my most satisfying projects ever. Although not perfect (especially if looked closely), it does give me a sense of accomplishment.
HGUC Jegan ECOAS – Work In Progress
April 11, 2014 at 15:19 | Posted in 1/144 scale, Work In Progress | 1 CommentTags: Jegan ECOAS, kitbash, M.S.G weapon, putty, work in progress
This is my first Work In Progress (WIP) post. Usually I include them in the methods section of each post, but the modifications I’m doing are rather extensive this time.
Back to the Jegan. Basically what I’m doing is kit-bashing: combining exisiting parts from one kit to another. It sounds simple, but actually not that straight-forward. I will describe each mod according to the body part.
Head: The only part that had the least modification. I replaced the antenna with a thinner one from Wave, just like my Jesta Cannon.

Chest: The kit comes with an additional chest armor that’s detachable. Underneath it, I glued a pair of square plates on the chest and filled the gaps with putty. On the sides, I glued a sheet of 0.5mm pla-plate. I also replaced the roundish bulges on the top chest with some squarish ones from Wave.

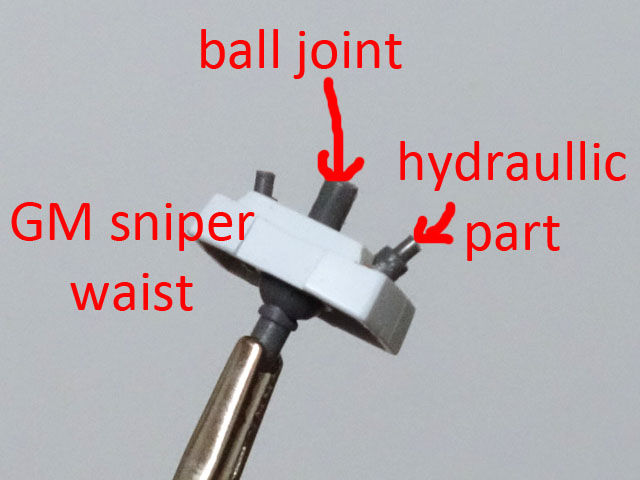
Waist: The waist was essentially non-existent, so instead of extending it with a sheet of pla-plate, I attached the waist from HGUC GM Sniper II. To connect the waist to the upper torso and hips, I used a ball joint from Hobby Base. I added some hydraulic joints for extra details and covered gaps with epoxy putty.
Hips: On the right hip, I attached the pistol holster from GM Sniper K9. I cut off the part originally meant to be attached to the thighs. Then I glued a piece of spare runner on its side so it can be attached to the hip. On the left hip, I made an attachment for the grenade launcher of the Kotobukiya assault rifle using pla-plate and spare Jesta parts.


For the front skirt armor, I used the ones from the HGUC Loto set. They didn’t come with pegs, so I glued spare ones from my HGUC Jesta Cannon kit to the Loto skirts. Behind them I glued some square plates for added detail. On the back I attached the front skirt from the GM Sniper K9 using epoxy putty.


Arms: I decided to discard the entire Jegan arms altogether. In its place, I wanted to use the arms from HGUC GM Striker but I didn’t really fancy the forearms. So I used the ones from HGUC GM Kai (Type C) kit. I further elongated the forearms and biceps by attaching a sheet of 1.2mm pla-plate at the middle and top parts, respectively.

Hands: I decided to try out 1/144 hands from Hobby Base which included a pair of clenched fists and fully articulate hands. In addition, I modified the HGUC hands to face down, just like my Jesta Cannon.

Legs: At first I thought of replacing the entire legs with HGUC Jesta legs. But while snap-fitting, I found out that the Jegan thighs can be attached to Jesta’s lower legs without any modification. On the left leg, I glued an attachment for the combat knife (salvaged from GM Sniper K9). On the right leg, I made a knee guard using HCM-Pro detail parts and leftover parts from Jesta Cannon. The square thrusters on the back of the leg were replaced with round nozzles from the GM Kai kit.


Backpack: I went for a modular backpack design for this project. First of all, I replaced the huge middle booster nozzle with a flatter one from GM K9’s backpack.

Then I made booster tanks using Builders Parts HD MS Tank. To make them swappable to the backpack, I glued the top half of Builders Parts HD MS Verniers to the tanks. The tanks were too long, so I cut them in half and glued a round plate at the bottom.

The first modular unit is high-maneuverability mode, which is basically the default backpack.
Second mode is reconnaissance mode, in which I attached an MS Radome from Bandai Builders Parts (left side) and a sensor unit (right side). I used some leftover resin parts (Sadalsuud kit), various clear lenses, antenna parts (Wave), and pegs (Kotobukiya M.S.G) to attach them to the backpack.


Third mode is barrage mode. On the left side, I planned to attach the missile launcher from Kotobukiya M.S.G but it felt a bit shallow by itself. So I glued two missile launcher units back-to-back to make it thicker. I covered the back with a sheet of corrugated 1mm pla-plate and glued an attachment socket from the Mercury Rev parts (free with Dengeki Hobby March 2014 issue). Remaining gaps were filled with putty.


On the right side, I used the missile launcher from HGUC Full Armor Unicorn and attached it to the backpack using a part from Build Fighters Mercury Rev.

Weapons: Given the tactical design of the Jegan ECOAS, the main armament is the HK416-type assault rifle from Kotobukiya. It fits the 1/144 scale nicely and the only mod I made was drilling a hole on the iron sights.

For its sidearm, I modified the pistol from GM Sniper K9 to resemble the Socom Mk23. I felt it looked a bit short, so I elongated the barrel using 1.2mm pla-plate. The trigger guard was from a spare GM rifle. I removed the entire lower part of the barrel and replaced it with a laser aiming module made from spare parts, pla-plate & putty.
The suppressor was salvaged from System Weapon 003. To attach it to the pistol, I glued a 9mm copper rod to the suppressor and drilled a 9mm hole in the pistol’s barrel.

For close quarters battle, I made a combat knife from the Mercury Rev parts and leftover plastic.

The only weapon I assembled from the Jegan kit was the bazooka. As an extra, I armed it with the bazooka from the HGUC Full Armor Unicorn.
And that’s it for the structural modifications. After this is priming step, painting, decaling and light weathering. I haven’t decided on the color scheme yet, but most likely I’ll stick with the ECOAS colors.
To view the completed model, see the full post here
Modelers-G

Blog at WordPress.com.
Entries and comments feeds.
