HGUC Galluss K
December 18, 2016 at 00:13 | Posted in 1/144 scale | Leave a commentTags: Galluss-K, resin kit, Schuzrum Gallus, weathering, Zeon Remnant Project
Introduction:
Two types of Gallusses appeared in the Unicorn OVA: the Galluss K and Schuzrum Galluss. I’m more interested in the Galluss K, but unfortunately there’s no HGUC kit of it. However, there is an old 1/144 scale Galluss J kit that looks a bit similar to the Galluss K. I initially planned to kitbash the Galluss J and HGUC Schuzrum Galluss kits, but later on I bought a Galluss K resin conversion kit at the C3 Chara-Hobby show.
Materials & Methods:
The resin conversion kit requires a HGUC Schuzrum Galluss kit. You can read about the building process here.
Later on, I decided to add some bits of plaplate at the shins, chest and leg verniers for added detail. I also used the large hands from Jigen Build Knuckles (round).
All parts were primed with Gaianotes Evospray Dark gray surfacer. I would have liked to tell you the paint ratios that I used for airbrushing, but I mixed a lot of paints that day and I forgot how I got the colors. That or the thinner fumes destroyed some of my neurons resulting in brief memory loss.
Anyway, after painting’s done, I applied an enamel wash using yellow + dark brown enamel paints. Then I added further weathering effects in the form of paint chipping using black + german gray enamels. Then I applied some decals and finished it with flat topcoat.
Results:


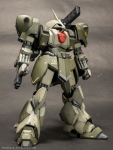


There’s actually not too many action poses I can make with it


And finally here’s some size comparisons. The Galluss K definitely belongs to the heavyweight class of mobile suits. It towers above the standard Zaku/Gouf units and is similar in height to my Zee Zulu and Dom Tropen.


Discussion:
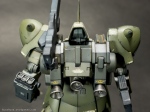
Despite the huge cost, I have no regrets purchasing this Galluss K resin conversion kit. The fitting is almost perfect and there’s no obvious gaps between parts. The only downside is that some parts have uneven surfaces.
Design-wise, it’s pretty basic. There’s no added details and it’s mostly large smooth surfaces. The only part that bothers me is the large chunk of resin behind the knees. They restrict movement to just a slight knee bend, reducing the number of dynamic poses I can make with it. The weight of the backpack would probably hinder dynamic posing anyway.
Speaking of weight, this is one of the heaviest 1/144 kits I have ever built, weighing in at 141 grams. For reference, a typical plastic HGUC kit is approximately 50 grams. Despite its weight, the joints feel father solid. I just hope the ankle joints can hold out.
So now that this is done with, the conclusion to my Zeon Remnants Project is getting ever closer…
HGUC Galluss K – Work in progress
December 11, 2016 at 17:57 | Posted in Work In Progress | 4 CommentsTags: Galluss-K, HGUC Schuzrum Gallus, resin kit, work in progress, Zeon Remnant Project
The initial plan for this Galluss-K project is to kitbash the HGUC Schuzrum Galluss with an older HG 1/144 Gallus-J kit. That plan changed when I bought a Galluss-K resin kit conversion at the C3 hobby show. You’d think that this will then be a straight-forward job, but it turned out not to be the case. Now let’s get started:
Head:
From the figure below, I had three heads to choose from. I couldn’t decide between the Galluss J or K heads, so I kept both.

I had to remove some excess plastic from the Galluss-J head to accommodate the internal parts from the Schuzrum Galluss head.

I trimmed off the original monoeye from the Schuzrum Galluss part and attached a round plate. Onto that I will attach a clear pink lens from Wave.

Arms:
The shoulder armor is from the resin kit, but I replaced the spikes with the ones from Kotobukiya MSG.

The arms are from the HGUC kit, but I had to remove the ‘sleeves’. I simply covered that part with putty and sanded it out.

Body:
The backpack consists of several huge chunks of resin. The resin kit didn’t come with any verniers, but fortunately I had plenty of spares lying around.

Another problem is that the original polycap joints in the HGUC body might not be able to support the backpack weight, leading to some balance issues. Therefore I decided to use the sturdier double ball joints from Hobby Base. I attached it to the upper body with some epoxy putty.

To connect the double joint to the hips, I attached a small pipe wrapped in epoxy putty to where the original polycap was. That way the body can still swivel sideways.

I had to trim some of the HGUC groin parts to accommodate the new resin part.

Likewise for the back part. In this case I had to remove a large chunk of the back skirt armor in order to attach the resin part.

Legs:
The thighs are from the HGUC kit, but I attached some plaplate to hide the joint that connects the leg to the body.

I had to cut off the HGUC knee from the shin armor and attach the resin knee to the HGUC shin armor.

The rest of the leg is just attaching resin parts to the HGUC legs.
Weapons:
The resin kit comes with a shoulder mounted cannon and two forearm mounted cannons. I decided not to use the resin shoulder cannon and instead used the rifle from the HG Jahanam kit, with some modifications of course. First I cut off the rounded muzzle and replaced it with a rectangular vent. Then I cut off the grip and replaced it with a joint from Kotobukiya MSG.

In addition to the above mods, I had to perform extra work on the resin parts. First, I soaked them in soapy water followed by a light scrub to remove any excess chemicals on the surface. As I was test fitting, I noticed some surfaces of the resin were uneven. I remedied it using some basic putty and lots of sanding. I didn’t want any resin powder flying around in my room so I did wet sanding instead.
To bind the resin pieces together, super glue is often adequate. But to reinforce the binding, I inserted a metal rod or pin on one half of a resin part. That metal pin is then inserted into a hole I drilled on the other half.

So here’s what it looked like before painting:


For reference, here’s what was on display when I bought the resin kit.

Zeon Remnants Project: current status
December 22, 2015 at 11:37 | Posted in Random rants | 3 CommentsTags: Desert Zaku, Efreet Schneid, Galluss-K, Zaku Cannon, Zeon Remnant Project
It’s winter again and as you can see from the totally scientific chart below, it means some downtime in my gunpla activity.

As a result, it is definitely impossible for me to finish the remaining Zeon remnant kits by this year. So far, of the 10 kits from this list, I have finished 7 of them. Here they are lined up nicely on my shelf. You can view them individually in the gallery page.

The remaining 3 are the Zaku Cannon, Galluss K and Efreet Schneid. If you’re wondering what happened to them, read on:
For the Zaku Cannon, I decided to build one that’s close to the original design instead of building a Zaku Half Cannon. I’ve settled on most parts on the top half of the body, it’s the legs that got me stuck. Completion status: ~50%

As for the Galluss K, it’s a kitbash between the HGUC Schzrum Galluss and the Galluss J. It’s not so straight forward as I would’ve liked and I still haven’t decided on a lot of things, for example the head & backpack design. Completion status: ~40%

I initially thought the Efreet Schneid would be the most problematic, but so far it hasn’t been the case. I’m using the Gouf R35 kit as the base and attaching Efreet Nacht resin parts on it. Right now I’m having problems attaching the lower legs (resin) to the knees. Maybe I’ll just use Gouf Custom legs instead. Completion status: ~60%.

And now I’d like to announce a last-minute addition to the Zeon Remnants Project: the Desert Zaku.

Using the HGUC Zaku II F2 kit as base, I added parts from the MSV Zaku Desert Type kit. The Zaku Desert Type and Desert Zaku are not the same thing, so this one will be a mashup of both designs. Completion status: ~70%.

It may seem that I have started all these projects simultaneously, but actually as I was building the Zaku Cannon, I got stuck on some parts and started with the Galluss K. Then when I encountered a problem with that, I started with the Efreet Schneid. And when that came to a halt, I started with the Desert Zaku. And so that’s how I ended up with four ongoing projects right now. I’m not sure when I can finish them all but it’s definitely not this year. With that I wish you all Happy Holidays.
Modelers-G

Blog at WordPress.com.
Entries and comments feeds.
