How to apply decals
August 13, 2008 at 14:35 | Posted in How-to | 57 CommentsTags: decals, dry transfer decals, gunpla, Mr Mark Setter, stickers, water slide decals
I don’t know why, but applying decals is my favourite part in building gunpla kits. Maybe it has something to do with my habit of slapping stickers everywhere (TV, fridge, furniture, cars etc…) when I was a kid. Anyway, decals are basically stickers you apply to your finished gundam kit. They add some sense of ‘realism’ and makes your kit look unique.
Basically there’s 3 types of decals:

The green one on the top left are just stickers. You peel them and just apply on the surface of your kits, just like you would for any sticker. The white one on the bottom left are dry-transfer decals and the blue one on the right are water-slide decals. I’ll explain how to use them in a bit. In general, all Master Grade kits come with sticker type and dry-transfer decals, while 1/144 HG kits just come with stickers. The water-slide decals are sold separately; the official Bandai ones cost ~400yen while custom decals vary. Personally, I don’t recommend using the sticker types. They stick out too much and look unnatural. I’ll be showing how to apply the dry-transfer and water-slide decals here.
Dry transfer decals
1. Cut out the specific pattern/design you want from the decal sheet using any sharp blade

2. Using a clear cellophane tape, pick up the piece of decal you just cut out


3. Place the decal where you wish. The cellophane tape helps to keep the decal in place

5. Rub on top of the decal using whatever stick-like material you can find e.g. toothpick. I used the bottom end of my paint brush. The decal will stick on you gunpla surface. In case of large decals, make sure you rub the entire surface. You can peel back the tape a bit to check if there are any bits still left on the decal sheet.

6. Peel away the tape. The decal should be on your gunpla and the tape should have an empty decal sheet.

.
Water slide decals
1. Again, cut out the design you want from the decal sheet

2. Using a pair of tweezers/forceps, pick up the decal you cut out and dip in water for roughly 8 seconds. I found that Bandai water-slide decals need less time, maybe 4-6 seconds while custom decals might take longer than 8 seconds. The purpose of this step is to detach the decal from the decal sheet.
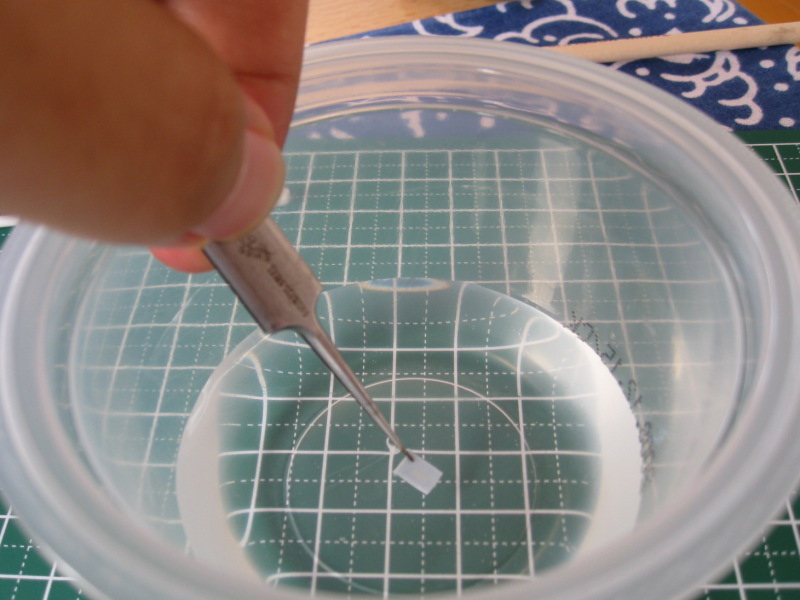
3. Using a cotton bud dipped in water, gently ‘tease’ the decal away from the decal sheet and onto your gunpla. If the decal won’t budge from the decal sheet, dip in water for a couple more seconds.

4. Once the decal is on your gunla, you can still adjust or reposition the decal. Once you’re satisfied with the position, use the dry end of the cotton bud to gently roll over decal to absorb extra water.

I would also recommend using Mr Mark Setter. The purpose of Mr Mark Setter is to make the decal stick better to your gunpla surface and to give the appearance that the decal was actually ‘painted’ on your gunpla.

- Apply some on the gunpla surface before applying the water-slide decal.
- After applying the decal, absorb the remaining liquid with a slightly damp cotton bud. Don’t leave Mr. Mark Setter on your decal too long because it will soften the decal and make it wrinkled.
I use Mr Mark Setter mostly to remove decal silvering. This refers to the whitish or silver-ish outline around the decal, caused by air pockets between the decal and gunpla surface. To remove this undesirable effect, this is what I do:
- Dab a bit of Mr Mark Setter directly on top of the decal
- With a sharp hobby knife, gently ‘stab’ the decal so that Mr Mark Setter can seep underneath the decal.
- After the silvering effect is gone, absorb the remaining liquid with a damp cotton bud.
Another item you can use is Mr Mark Softer.

I hope that by reading this post you’ll find that applying water-slide decals is a relatively painless process. It is definitely a step-up from regular stickers and will make your gunpla look better. Enjoy decalling!
57 Comments »
RSS feed for comments on this post.
Leave a reply to kusakusa Cancel reply
Modelers-G

Create a free website or blog at WordPress.com.
Entries and comments feeds.

This was extremely helpful… i do regular decalling, but the tips still apply. Thanks.
Comment by Decals— August 26, 2008 #
Decals Links…
Tagged your site as decals at iLinkShare!…
Trackback by iLinkShare (Web 2.0 linksharing)— August 26, 2008 #
hey thanks for the tip on applying decals. i wanted to know if you can still use the mr. mark setter on the peel and stick decals? and will it look as flush as the water type decsl?
Comment by juan— September 17, 2008 #
i’ve seen mr mark setter being used on the sticker-type decals in some hobby mags, but the results dont look as good as the water-slide decals
Comment by kusakusa— September 17, 2008 #
so peel and stick type decal are not that good for models?
Comment by juan— September 21, 2008 #
well, nothing’s stopping you from using sticker-type decals. they actually look acceptable on white-colored kits, but not so nice on dark-colored models.
but once you start using water-slide decals, you never want to use the sticker types anymore :)
Comment by kusakusa— September 22, 2008 #
rite ill try to use to water type pokemon on my rx 79 g model! thanks, i have learned alot from you!
Comment by juan— September 26, 2008 #
kusakusa,
This whole section, I found, was fun and informative. Especially for me, your basic novice or newbie when it comes to model building. Finding you guys, and what you’ve done for us, has been very helpful and I appreciate your work. I look forward to reading more of your new articles.
Bless Ya’s and many Thanks Mates, Charliek
Comment by Charlie— December 25, 2008 #
thanks charlie. glad you found this section useful. i’ll try to add more stuff if im not too busy. cheers
Comment by kusakusa— December 26, 2008 #
thank you so much on how to applying dry decals i got many problems in my wing gundam ver ka specially on the wings the curves!! by the way thanks..
Comment by Tennessee— December 29, 2008 #
hey can u use this for the transparent stickers dat come with the mg??? and dry transfer decals???
Comment by asian1skill— January 27, 2009 #
asian1skill: i think the transparent stickers you’re talking about are actually dry transfer decals. i referred to them as white because of the white sheet of paper(?) behind it. it’s actually a transparent decal sheet with designs, as you said.
Comment by kusakusa— January 27, 2009 #
great tutorial! it really helped me out when i needed it the most!
Comment by chinchillas— February 7, 2009 #
It works!!!
I used my own finger before when seperating water decal from it’s sheet causing most of the decal to tear because of my finger pressure…
Then i followed your tips about using a wet cotton bud to press the decal when seperating it, and it works pretty well. Thanks.
Comment by Master P Rayer— February 12, 2009 #
Hey great tutorial!
I’m just trying it recently on my vf-25f, and find it works well.
One question though…if i give the decals that already at the kit water, it always peel off again and again, is that the right thing?
Because i see at other blog that water decal will “melt” to the surface and wont fall off again even if touched by water.
Comment by eyeshield30— February 18, 2009 #
eyeshield: if you apply water to the already dried decals, it is possible to peel it off, but the decal wont stick too nicely after that.
however if you used mr mark setter before and then tried to peel the decal off by applying water, there is a high chance you will rip the decal because mr mark setter acts like a glue for water-slide decals
hope that answers your questions
Comment by kusakusa— February 19, 2009 #
So, thats mean… Never ever apply water again to the dried decals?
So thats the problem.
I’m becoming frustrated too, the water decal that had been applied got torn apart because i touch them when i’m playing with the kit. Luckily i only test that one decal. Is waterslide really need protection??
thanks again ^^
Comment by eyeshield30— February 19, 2009 #
i see… one advice i can give you is don’t treat your kit like a toy. it’s a model meant for display after all. i myself can’t resist the urge to play around with my model kits sometimes, but it would be better to avoid touching the areas with decals.
i also recommend using mr mark setter because as i said, it makes your decals stick better and have a less chance to accidentally peel off
Comment by kusakusa— February 20, 2009 #
Oh, i see, hehe. The kit i’ve been talkin about is the VF-25F alto’s. It happened when i try to transform it to Battroid mode xp.
and, what i mean protection is, after we apply decals we protect it with some coating.
Mr. Mark setter is used before we apply decals,right? Sadly i can’t find either mr. Mark setter or Top coat anywhere in here, sob…
Anyway, thanks for answering. Sorry if i bothered you with these question. Hehe.
Mind if us exchange links?
Comment by eyeshield30— February 20, 2009 #
Many modeling sites speak of the benefits of using Future when applying decals. What’s your take on it?
Comment by westfall— February 24, 2009 #
westfall: unfortunately Future is not widely available in most asian markets, so i never had a chance to use it.
but from what i’ve read in other sites, they didn’t use Future when applying decals, rather AFTER applying them. Spraying a coat of Future might help to ‘protect’ the decals from accidental peeling off. It’s basically a cheaper substitute for Gunze topcoat sprays.
I may be wrong, though
Comment by kusakusa— February 25, 2009 #
Does topcoat necessary to apply on water slide decals? or mr marksetter is enough?
Comment by maseko— April 8, 2009 #
liked the tutorial alot. It has helped with my water decaling problems and the fact that i sometimes mess up on regular dry transfer. the idea of tape never came to mind -_- lols. also the transparent stickers sometimes ruin the look of a gundam. although one of my friends likes to use them before he puts on a gloss coat. that works so theres another tip for those who didnt know XD
Comment by Loic— April 13, 2009 #
As a Future user I must say that applying it before applying decals will help the decal blend in. On a glossy Future coat the waterslide decal will be less visible than on a flat/semi-flat coat or on bare plastic itself. Mr. Mark Setter will also help to blend the decal in and yes, a layer of Future after the decal will help preventing it from scratches or peeling of. :)
Comment by Pim— April 16, 2009 #
What’s the difference between mr mark setter and mr mark softer?
specifically in function and when and how to apply?
Comment by AceDudeyeah— May 5, 2009 #
i guess the difference between the two is ‘melting power’. im not sure how to explain it, but mark setter dissolves decals more strongly than mark softer.
mark softer is mostly used when you apply waterslide decals on uneven surfaces (eg. raised surfaces or crevices). in order to make the decal conform the the shape, just dab some mark softer on the decal, which will make it softer, thus easier to blend along the shape.
Comment by kusakusa— May 7, 2009 #
thanks.
I am looking for a solution to hide/melt the edges of the decal.
according to your guide, i think setter will do that….right?
and can either of them melt away the edges of the marking stickers that come with the Master Grade models so that they too look painted on?
Comment by AceDudeyeah— May 8, 2009 #
yeah, mark setter will do the job for waterslide decals.
but i don’t think mark setter or softer would make any difference for the stickers coz they’re just too thick, plus they’re not made of the same material as the waterslides
Comment by kusakusa— May 8, 2009 #
Can i spray a layer of acrylic lacquer to seal the water decal after i applied them (that is, spray the whole kit gloss)?
Comment by EXkurogane— October 2, 2009 #
i dont see why not, if you want your kit to be glossy
Comment by kusakusa— October 5, 2009 #
are the decals for 1/100 gundam designer’s version water-slide?
Comment by xadowz— December 30, 2009 #
im not sure which gundam you’re talking about but if its blue, then its most probably waterslide
Comment by kusakusa— January 6, 2010 #
i have another question… err… can water slide decals be used on metallic/plated kits? For someone who’s lazy to paint like me, I’m thinking of getting Sinanju Titanium… the normal one looked a bit too plasticky to me -typical problems of red gunplas, at least to me…
Comment by EXkurogane— January 24, 2010 #
Regarding Mr Mark Setter, do you let anything dry before applying the next “layer”? Or is it wet decal on wet Setter, then Setter on wet decal?
Thanks a bunch for the tutorial ^^
Comment by anshrr— February 17, 2010 #
i dunno if this is the correct way, but what i usually do is apply wet decal on wet setter, then soak up the excess water. if there’s silvering, then i apply another layer of setter on the dry decal. leave for a few sec, then soak up the excess setter.
Comment by kusakusa— February 18, 2010 #
Thanks for the reply ^^ I’ll hafta test it out, wet decals seem like fun :D
Comment by anshrr— February 20, 2010 #
what if I’m using the dry-transfers on a painted kit? I’m a pro with water slides, but the ones for the MG Quanta aren’t out yet…
Comment by NightBrother— December 19, 2010 #
depends on what paint you used. if its flat paint, then maybe its better to apply a layer of gloss coat before you apply the dry-transfer decals
Comment by kusakusa— December 20, 2010 #
I’ve seen some websites sugguesting the use of gloss coat on the kit b4 decals and panel lines. is this ok?
So if its right, the procedure should be:
1. Gloss coat
2. Decal with Setter
3. Final Gloss/Flat Coat
Comment by jon— January 25, 2011 #
yeah, that sounds about right. you can skip step 1 if:
a) you didn’t paint or sand your kit
b) you used gloss or semi-gloss paint on your kit
c) you’re skint :p
you can read up further here: https://kusakusa.wordpress.com/2010/11/29/how-to-gunpla/
Comment by kusakusa— January 26, 2011 #
After applying the setter on the plastic and putting your decal on it, can you still move the decal around to better reposition it? I’m kind of picky about decal placement.
Comment by Derp— October 12, 2011 #
yes you can. but its best to do it quickly because mr mark setter softens your decals and too much moving around may tear your decal
Comment by kusakusa— October 14, 2011 #
Is there a method to fix teared decals after applied on the kit?
Comment by Ralph— January 4, 2012 #
if it’s dry-transfer decals, then probably not. if it’s water-slide decals, you can try to reposition the torn decals using a wet cotton-bud if the decals are still wet. if it already dried up, then i don’t think it can be salvaged
Comment by kusakusa— January 4, 2012 #
that’s so useful. thanks for sharing
Comment by kojack— February 18, 2012 #
Kusakusa…. i tried water decals for the first time…. i dip it in water, then apply like you did… and leave it to dry for about 2 to 3 mins.. but i touch/rub it a bit hard, they came off.
Comment by Vist2012— October 17, 2012 #
i highly recommend you to apply some topcoat (flat or gloss) on your kit after you apply waterslide decals. or you can use Mr Mark Setter when you apply decals so that the decals stick better to your kit
Comment by kusakusa— October 17, 2012 #
What do you suggest for Dry transfer decals that don’t transfer from the carrier to the model no matter how often you rub it?
I’m using decals that maybe old and a few of them were very difficult to transfer, one just won’t transfer at all
Comment by Sam— October 22, 2012 #
Which one will i use at the top of the decal is it the mark setter or mark softer? And can i use the water slide technique for the ordinary peel and stick type of decal? Thanx for your help :)
Comment by Gundam fan— December 25, 2012 #
I see lots of comments here some good some crap, but as I have been building award winning models of all kinds I can tell you my way used for 25 years!
Build your model, paint it, then GLOSS coat it completely (I use an airbrush with testors gloss coat but you can use spray cans or brush on)
Let dry for 24 hours.
Apply decals, you can use a setting agent if you have it, it helps the decal to slide as it shrinks while drying. You should also use a softening agent like Micro-Sol to soften decal if it is going to be applied over a uneven surface, like rivets…. it softens or melts decal so it ca conform to surface better.
watch model as decal shrink and dry, gentle application of softening agent may be applied to troublesome areas.
Let dry 24 hours
Re gloss coat entire model to seal in decal.
let dry 6-7 hours
apply final finish coat if it is to be “other” than gloss
I have 20+ year old models that I game with regularly that look as good as new! I sometime even gently was them with warm water an a SOFT brush to clean off dust!
Bill
Comment by vonkluge— January 1, 2013 #
PS. DO NOT USE MATT COAT AS A SURFACE TO APPLY WATERSLIDE DECALS TO it will trap air under the decal and create the silvering effect. Decal will also not adhere well to the model. Gloss coat! finish coat can be Matt.
Dry rub transfers sort of suck, never like them, they don’t work well if old and if you get placement wrong there is no moving them!
Use an old brush to gently move and place your decal while it is still wet and there is plenty of water around the surface. After that DON’T touch it.
let it dry by its self.
Comment by vonkluge— January 1, 2013 #
How much Mr Mark do you apply before and after putting the decal?
Comment by Windy— January 16, 2013 #
Not much. Just enough to cover the decal.
Comment by kusakusa— January 16, 2013 #
Follow up question: How long should you let the setter set and do you need to wipe it off afterwards? Thanks!
Comment by Windy— February 2, 2013 #
i wouldn’t want to leave the setter on the decal for too long, it will cause your decal to become soft and wrinkly. so just a few seconds will do and absorb the rest of it with a cotton bud
Comment by kusakusa— February 4, 2013 #
Erm.. I don’ know if its asked before but i just got my MG Exia and the dry transfer decals, do you need the translucent backing paper to stick or what? Cause it had been some time(like 1/2 yr) and the backing paper can’t stick anymore.
Comment by Firedracax— June 25, 2013 #
the backing paper is just to protect the dry transfer decals from being accidentally attached to other surfaces. you don’t need the backing paper to stick to anything
Comment by kusakusa— June 26, 2013 #